InsuredMine CRM | Optimize and Grow Your Insurance Agency

Tasklist

Organizing your tasks with a list can make everything much more manageable and make you feel grounded. Seeing a clear outline of your completed and uncompleted tasks will help you feel organized and stay mentally focused. With InsuredMine, you can assign a task to co-workers and track when it gets completed.
Whenever you assign a task to any co-worker, they get an email notification and the task will be listed under their task list.

Enhancement! June 2020

Tasklist module in left navigation

It is easier to access Tasklist with enhanced functionality to work faster. The Tasklist navigation can be seen below:

Assign and Track task

  1. Go to the My Task List Widget on the Dashboard and click on the + Add New button to add a task.

You can also navigate to the tasklist module from the side menu bar. This will open the task list page, on the top right you will find Add New button to add a task.

2. Add your task name, task type, contact name, due date, assignee (if required), priority, a short description, due date, time, and duration. You can add an attachment if required. Click on add to task calendar and click on the Save button.

3. Your task will be added to the widget.

4. To get to the view of Task Description, click on the EYE icon on the left corner.

5. To change the status of the task in the Status column, you have to click on the Status (Done/Pending). If it’s marked Pending, after clicking, it will show as Done and vice versa. Also, you can mark all tasks in the list as Done or Pending by clicking on the Done or Pending Button respectively. These can be seen in the upper right corner of the My Task List segment.

Card Details– You can find the card details of the deal card that is associated with the task. To open the deal card, click on the card detail icon.

Enhancement! June 2020

Map External Contact in Task

In the Add Task window — You can now write any name you want in the contact field, no need to select a contact from the list. So, now agents can refer a task to anyone other than the saved contacts.

To view the enhancement:

  • Navigate to the tasklist.
  • Click on Add new
  • Add all the required information.
  • In the contact section when you type in the name that is not saved in your contact list, it will show no contact found, but still, you can add a task for this new contact.
  • Click to save.
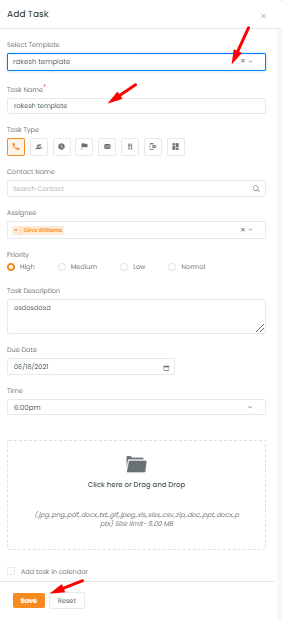
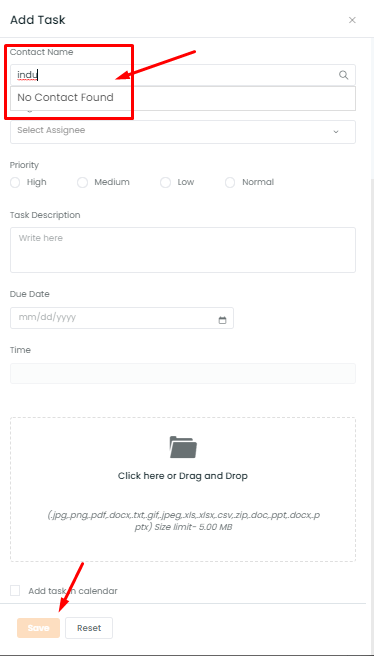
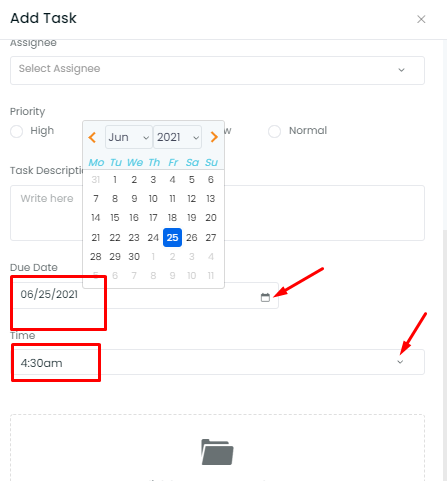
  • You will get a notification saying: Task added
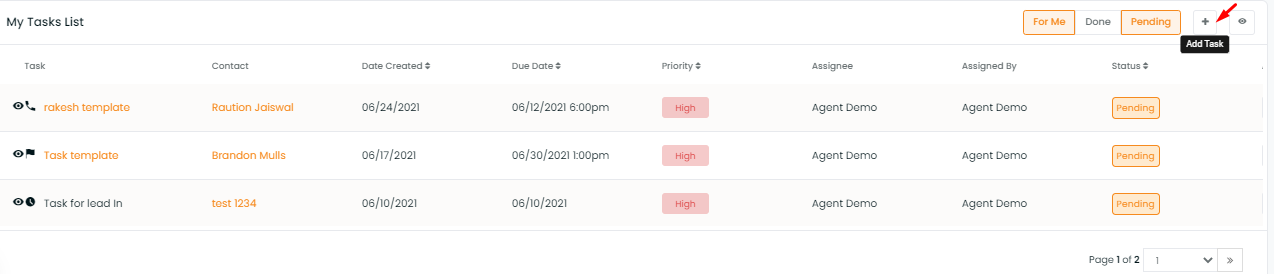
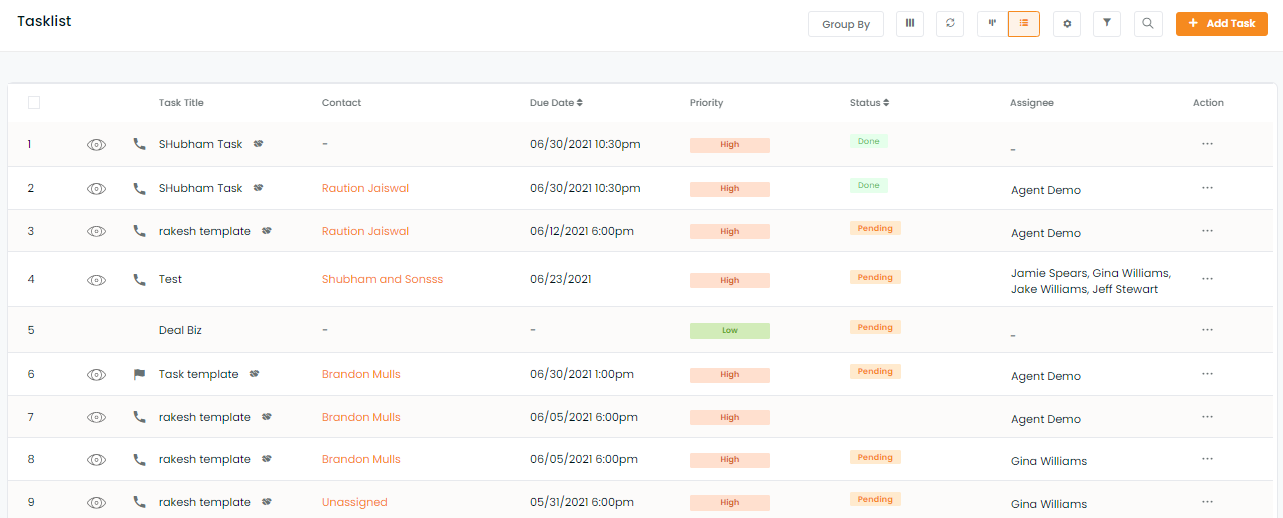
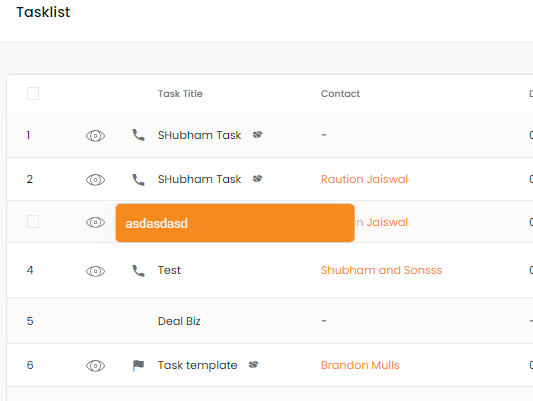
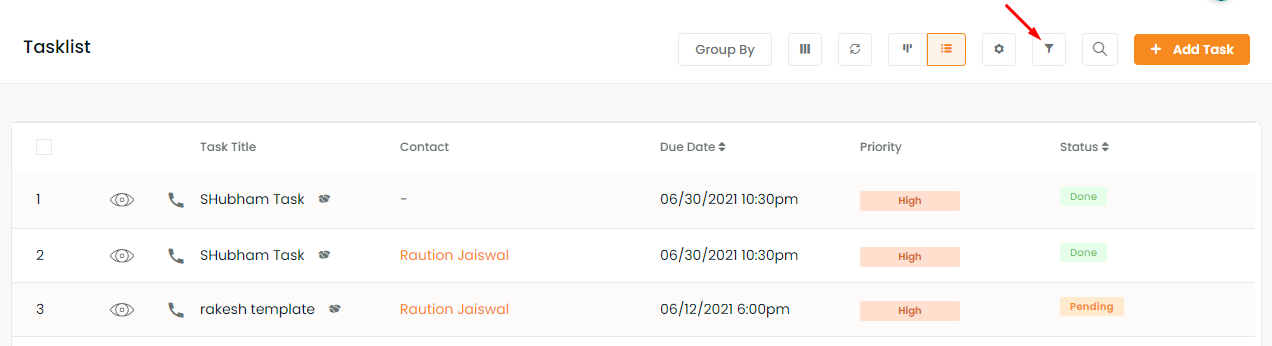
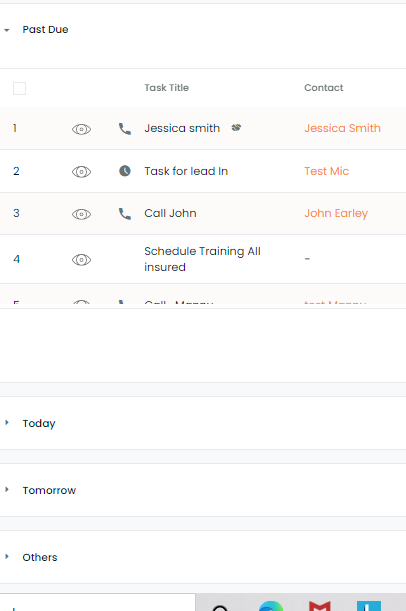
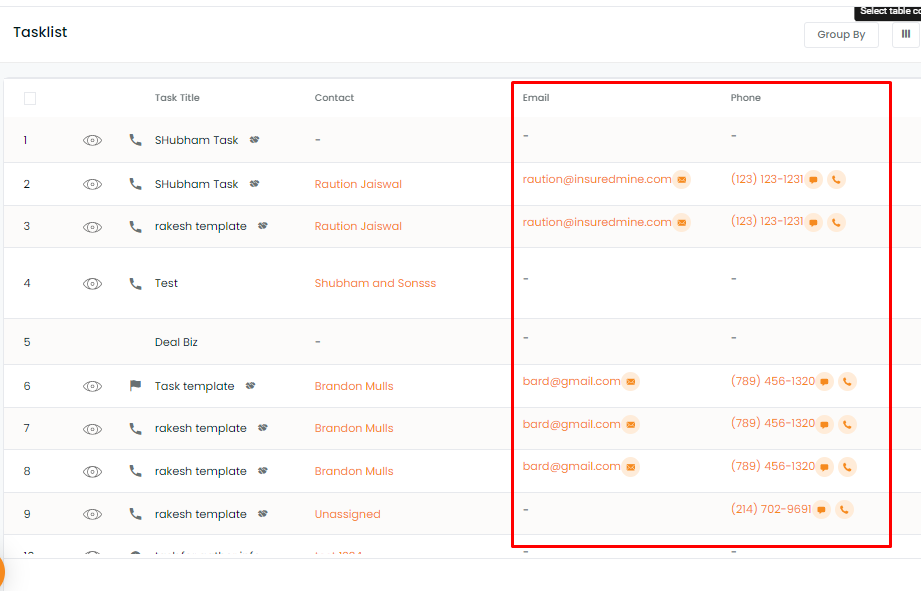
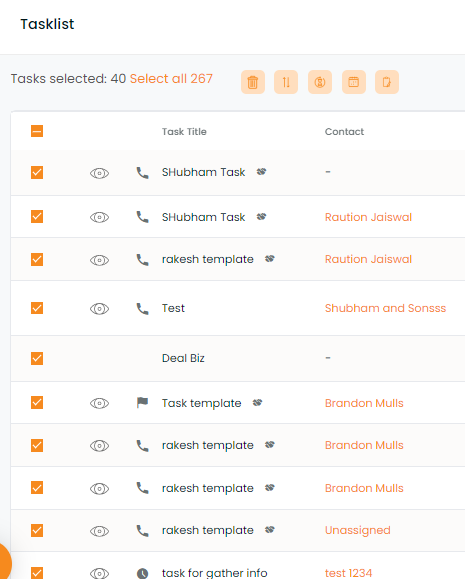
  • In the tasklist the task added for new contact will be visible.
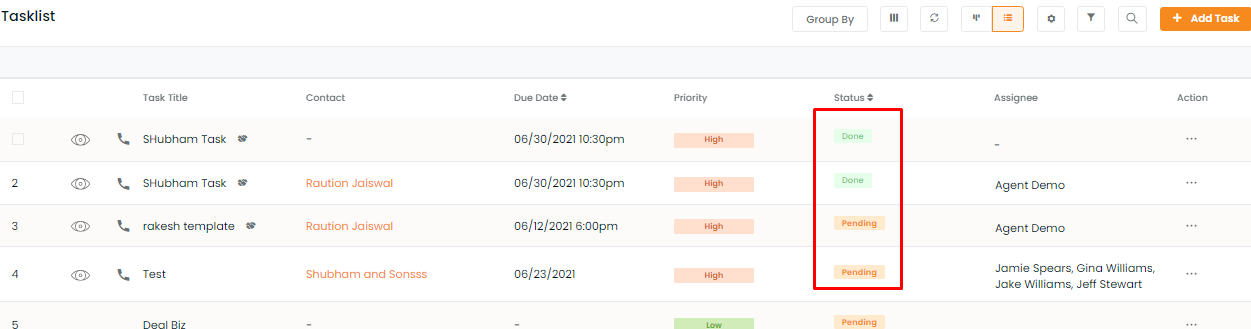
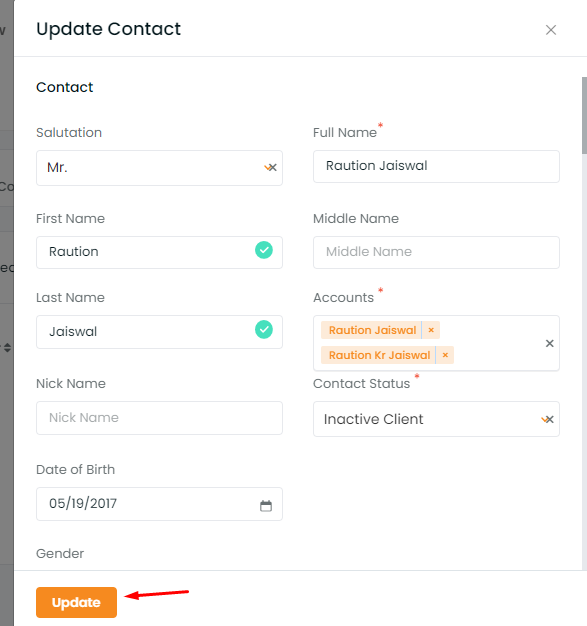
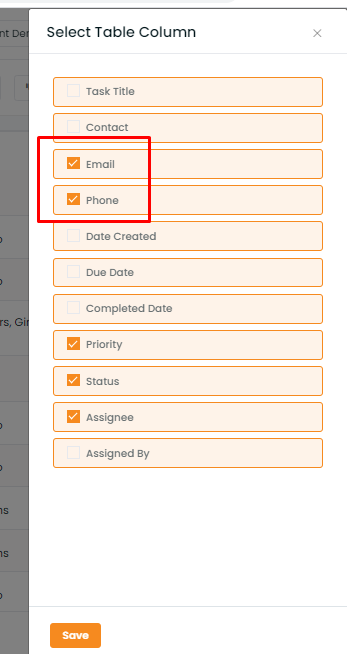
  • You can also edit the name by clicking on the contact, which will take to to the contact 360 page.
  • Once you finish editing, click on the update button to save changes made to the contact.

Enhancement: March 2021

Tasklist Enhancements- Multiple assignees, Attach files and task information.

Multiple Assignees- You can add multiple assignees while adding a task. Click on the dropdown in the assignee section to select multiple names.

Attach Files- You can add attachments of any file format up to 5 MB. (.jpg,.png,.pdf,.docx,.txt,.gif,.jpeg,.xls,.xlsx,.csv,.zip,.doc,.ppt,.docx,.pptx)

Task Details

In the task list, task widget or task timeline, you can click on the task name to view the task details.

You can also edit the details, add attachments, add comments, add assignee names and click to add these inputs. 

TaskList Filters

  1. To filter your tasks, click on the filter button present in the top right corner on the Task Details page.

2. The Filter list will open, click to expand each required filter and select the desired ones and click on the apply button.

You can apply various conditions to view data details as required. The functionality of each filter is discussed below:

  1. Assignee Type: You can opt to view your tasklist or other agents’ tasklist through For me or For others option.
  2. Status: To view the list of tasks completed select Done. To find information on pending tasks select Pending.
  3. Priority: If you want a list display for particular ranked tasks select the preferred priority tag.
  4. Task Type: Select the tasks based on the action call, meet, mail, message, task template, task to be done, etc.

5.Created Date: Sort the tasklist based the dates on which the tasks have been created.

6. Due date: Tasklist records appear divided into Subcategories of Today, Tomorrow, and others.

Group By

You can view the tasklist based in a cluster form by grouping the tasks based on priority, status or due date.

Priority – Group categorization of tasklist is seen in Low, medium, and high priority.

Status – Tasklist appears grouped under Complete and Incomplete categories.

Due Date: Tasklist will be visible for the selected due date.

Note: All 6 filters can be applied in tandem. Also, you can clear an applied filter by clicking on the x next to filter name appearing in the tasklist ( close icon highlighted in blue, as shown in the image below). You can also click on reset filter to sreselect filters of your choice.

3. You will be able to sort all your tasks according to your choice of action.

Note: Every task created in the My Task list segment, can be clicked to open it’s expanded deal card in the assigned pipeline.

You can choose the display of your tasklist by selecting either card view or list view. Refresh button is also provided.

Enhancement! September 2021

Tasklist Filter by Deal Cards

You can now filter your task list by tasks created from a deal card.  You can separate your tasks that are related to deal cards and tasks that are not related to deal cards.

To view the enhancement:

  • Navigate to Tasklist

  • Click on filters

  • Scroll down and click on Pipeline

  • Here you will get 2 options- Task related to the Card and Task not related to the card.

  • Choose anyone and click on apply.

  • Based on your filters the task details will appear in the tasklist.
  • You can also filter your tasks by applying the due date in Group by section
  • Once the filter is applied, you can view the filters on the top, when you click on filters.

Enhancement! June 2020

Select Table column in Tasklist

You can view tasklist records and obtain specific information as per your need in the task list Table. Select table column icon allows you to choose columns you want to view regularly, eliminating the clutter of excessive information which may not be required at the moment. 

Steps to Select Table Columns are mentioned below:

  1. Go to Tasklist from the left Navigation.
  2. Click on the Select table Columns icon towards the right as shown in the image above. 
  3. Mark the columns you require in an accessible view from the Select table columns screen.
  4. Click Save

Enhancement! June 2021

Added Columns in the Task List

In the tasklist two new columns have been added- Email Address and Phone Number.

To view the enhancement:

  • Navigate to the Tasklist
  • Click on select table column icon
  • A window will open to select the table columns, select email, phone as required.
  • Click on the save button.

Once saved the email and phone of the respective contacts of the task will be displayed in the tasklist table.

Note: By default, the tasklist is displayed with the Pending filter enabled.

Pagination in tasklist for sorting and searching

Pagination provides an organized appearance of Tasklist to make entities clearly visible and table content convenient to work. A list of 50 entries is available per page. It improves readability and reduces loading time so your search results appear faster. You need not infinitely scroll down 5000 records. Pagination helps break lists into easily understandable fragments. 

Click on page numbers at the bottom to jump pages while sorting or searching.

Enhancement! June 2021

Send email notification to Assignee for the completed tasks

In the Tasklist module, when you mark task status as done, the agent who assigned the task receives an email notification, informing him/her that the task has been completed.

Task Type

While adding a task you can mention the task type. There are various options to select task types such as call, meeting, lunch, task, deadline, email, text message and others.

How to Add Task Type?

To add task type follow the steps mentioned below:

  1. Navigate to the Tasklist module and click on Add Task
    (+) icon to towards the top right corner as shown below

2. Click on the appropriate task icon to add task type and click Save.

Download Tasklist

Get instant access to your tasklist by downloading it for convenience. Keep track of your deadlines and makes sure the work gets done efficiently and on time.

To download the tasklist follow the steps mentioned below:

  1. Navigate to Tasklist
  2. Click on the gear icon and select Download.

Search Option

You can conduct search based on Contact name, Assignee, Assigned by and Task title in the tasklist. To search for a task or contact go to the Search box. It lets you quickly find a task on the Tasklist. Type the text you want to search for in the Search box, and then press ENTER. Access filters the list to show only those records that contain the text you searched for. You can find the search box at the top-right corner of the tasklist.

Saved View with filters

Since there are so many options to filter your task list and if you have a favorite view with specific filters, which once applied will be your view until you change it to another filter view or reset it. Your view is by default saved for later use. You can start right from where you left. You need not apply filters again and find tasks.

Enhancement! January 2021

Due Time, completed date in task

When the admin/ agent is adding a task, he can set the due date and a time by when the task needs to be completed.

Here’s a quick guide on how to set the due date and time:

  • Click on tasklist
  • Click on Add New from the top right section
  • Fill in the task name, task type, contact name
  • Select the assignee name from the drop-down
  • Choose the task priority, give a task description
  • Select a due date
  • Set the time by when the task needs to be completed
  • Click to add task in the calendar
  • Click to save.

Enhancement! January 2021

Multiple selection and action

Now you can easily select the tasks and perform the actions from the tasklist section. This enhancement is made to make your work easy and fast. How to do multiple selections and assign action from Tasklist?
  • Navigate to Tasklist
  • Click on the filter icon
  • Select the filters for the tasks that you want to view. (filters can be applied based on Assignee Type, Status, Priority, Group By, Task Type, Created Date and Due Date)
  • Click on Apply
  • Select the Tasks

Note: You can choose and select the tasks as required.

For selecting all tasks from the same page, click here.

For selecting all the tasks, click here.

  • Click on the tasks that you want to perform (Delete, Update priority, Update Status, Due Date & Time, Task type)
  • For delete: once you click on delete after selecting the tasks, you will get a warning message, click on yes to delete.
  • For updating priority: Choose from the dropdown- high, medium, low, or normal.
  • For updating status: Choose from the dropdown- Done, or Pending
  • For Due Date & Time: Select the due date from the calendar and click on drop-down to select the time.
  • For task type: Click on call, meeting, task, deadline, email, lunch, text message, or others
  • Click on Update 

Enhancement! July 2021

Mandatory fields in Tasklist

You can set mandatory fields for the tasklist section. So while adding any task agents need to fill those mandatory fields.

To set the mandatory fields for the tasklist:

  • Click on the user icon.

  • Click on settings

  • Click on configuration to expand the section and select mandatory fields.

  • Click on the Add Task tab

  • Select the fields that are required.

  • Once selected there will be a pop-up saying Mandatory fields updated.

  • Once done, if you navigate to the Add Task panel, you will find the selected fields marked as mandatory.

Enhancement! June 2021

Related Articles

Would you recommend this article?

Related Categories

Contact Us

Looking for more information or want to try one of our paid plans?

EMAIL

PHONE

OUR LOCATION

Search
Generic filters

Most Search: Ams360Release Notes