InsuredMine CRM | Optimize and Grow Your Insurance Agency

Pipeline Automation

In this article, you will learn:

Current clients – if you are already using Pipeline Automation then you will have to request support to upgrade Pipeline Automation for your Agency. However all new agencies being onboarded henceforce will be on the upgraded version.

The automation feature is provided in the Pipelines section for creating instant automation without any manual hassle. Now, you can create customized automation for instant communication with the respective clients at a given point of time and trigger. This automation can be generated at various stages of the deal card.

The best part of this automation feature in the pipeline is that, once a process has been set, every time it will run when the trigger is there.

Before setting up any automation remember two things.

  1. Triggers – What is causing the automation
  2. Actions – What will happen when the trigger is activated.

Examples of triggers:

  1. Change in Deal Stage
  2. Add Category
  3. Add Label
  4. Deal won
  5. Deal Lost
  6. Add deal

Examples of Actions:

  1. Email
  2. Text
  3. Task
  4. Notification
  5. Checklist
  6. Move
  7. Assign
  8. Won
  9. Lost
  10. Handwritten cards

Assignee for Pipeline Automation

Note: In pipeline automation all communications by default will be sent through the assigned agent communication id of the agent assigned for the particular deal card.

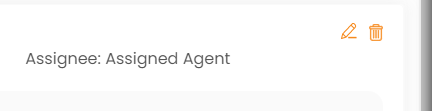
Assigned agent is the agent whoever is assigned to the deal card.

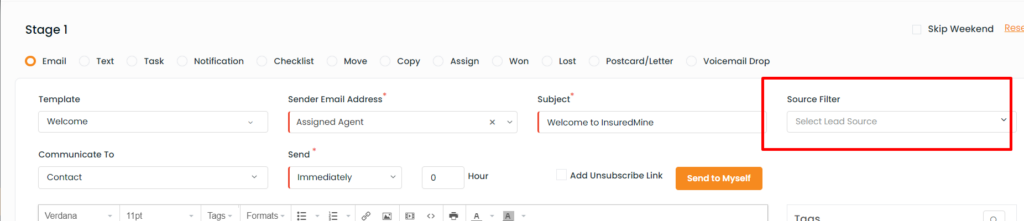
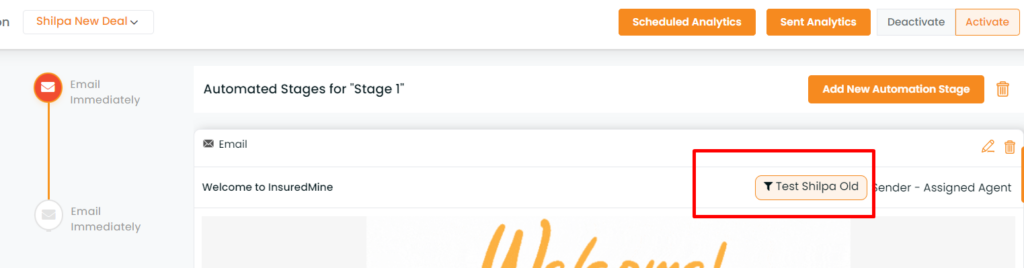
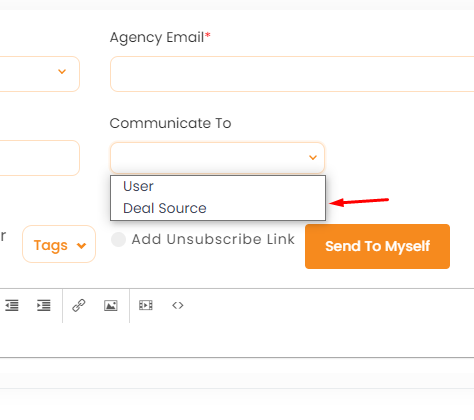
While creating automation, in the sender email ID section, you will find Sender Email Address is set as Assigned Agent by default.

Note: The communication email ID, signature, tags, all will be of the assigned agent.

How to get to the automation section from Pipeline Manager?

  • Click on Pipelines
  • Select the Pipeline
  • Navigate to the gear icon
  • Click on Automation

Note: The automation that is created works equally for all agents. 

The automation will work for the selected pipelines for which it is created

  • In the left panel, you can see all the stages that have been created for the selected pipeline.

You can create automation for the pre-set stages for the particular pipeline.

Enhancement! March 2021

Pipeline Automation has a New Look

A new user interface has been designed for easy view of your pipeline automations.

Pipeline automation:

How to add automation to the stages?

  • Click on the particular stage from the left panel.
  • Click on the Add Automation button
  • Fill in the required fields- type/ module of automation, subject, agency name, email, template, communicating contact, when to send, tags (if any), attach any file (if required)
  • Click to save

You can also add stages to it if required.

Note: You can select the particular stage and can directly add stage change automation to that stage

For example, if you create a card on stage 1, and want to move it to stage 3, so whatever automation that has been already created for stage 1 will start to work for stage 3 too. 

In the case of the change stage campaign, the automation will get visible in the drip campaign section when the deal card will move from one stage to the particular set stage.

Enhancement! March 2021

Rearrange Pipeline stages by drag and drop. To view the enhancement click here.

How to create automation for moving a deal card from one stage to another?

Agents can now create automation for moving the deal card from one stage to another based on certain conditions.

For example, the Agent is setting a trigger for the issue policy pipeline and wants to set that when a deal card reaches stage four, it gets moved to the follow up the pipeline.

Once the automation content is set

  • Click on move.
  • Set the time trigger– Immediately or After

In case of after: choose day/week/month, number of days/weeks/months, time, or after how many hours.

  • Select the pipeline stage where the deal card is to be moved
  • You can click on start stage automation to start or can click on stop running automation to stop.

Once the card will move from stage 4 the move action will get activated and as per the set time, the trigger will run.

How to add automation to additional triggers?

  • Add Category
  • Add Label
  • Deal won
  • Deal Lost
  • Add deal

Automation for Add Category

The categories for which automation will be set will work equivalently for any deal card that falls under that category.

Note: If there is automation set for any category or label that is added to any deal card, it will trigger automatically.

For example: For add category triggers, suppose, if there is any series of communication that you want to send to any client with a deal card of a particular category eg. Auto (personal), the automation created will run for that particular deal card.

How to create automation for Add Category trigger?

  • Click on Pipelines
  • Select the Pipeline
  • Navigate to the gear icon
  • Click on Automation
  • Click on Add Category
  • Click on Add Automation
  • Fill in the required fields- type/ module of automation, subject, agency name, email, template, communicating contact, when to send, tags (if any), attach any file (if required)
  • Click to save

Note: You can select multiple categories. 

The significance of this Add category automation is that whichever deal card will have the specific categories, the automation will trigger automatically for those cards too. 

Once you select categories need to click on start automation then the automation will run

How to create automation for Add Label trigger?

For every deal card, users add labels to it based on the deal health or various other sources. And based on these labels, now agents can run automation too.

Example: Suppose you want to run automation for the deal cards with label warm and referral partner mentioned in it. In that case, in the add label section, he needs to choose the label names, and then click on add automation and fill in the details to run the automation.

Enhancement! October 2021

Add Won/Loss Deal Automation in Pipeline Manager

You can add a label while setting a won or lost automation through the Pipeline section. This enhancement will help you to create more specific pipeline automation. Please note only admin will have access to this feature.

To view the enhancement:

  • Navigate to Pipelines.

  • Click the 3 dots in the top right corner.

  • Click on Automation

  • Select +Add Stage Automation

  • Select won/lost

  • Select won/lost agent name, label, won/lost reason, and check the box to start automation.

  • Click on save.

To Setup Won Deal Automaton:

To Setup Loss Deal Automation:

The label will display in the automation stages screen:

For won deal:

For lost deal:

How to create automation for the Deal Won/ Deal Lost trigger?

Agents can run automation based on deal status – Won or Lost. If an agent wants to create automation for all the deal cards that are marked as won/lost, can do that from the pipeline automation section.

  • Click on Pipelines
  • Select the Pipeline
  • Navigate to the gear icon
  • Click on Automation
  • Click on Deal Won/ Deal Lost
  • Click on Add Automation
  • Fill in the required fields- type/ module of automation, subject, agency name, email, template, communicating contact, when to send, tags (if any), attach any file (if required)
  • Click to save

Note: You can see the analytics of this automation in the Drip Campaign section of the particular deal card. 

Actions:

Multiple Actions can be performed through pipeline Automation

Through single automation, an agent/ admin can perform multiple actions at one time. This feature is extremely beneficial as it will save time and increase productivity by generating instant communication as well as bring consistency in approach.

For example: When a deal moves from one stage to another, if an agent wants, he can send an email/text to the client, can assign a task for another agent for follow up, can send a notification to the agent for the tasks done. However, each action needs to be created as separate stages within the automation.

  1. Email

How to set automation to send email to users or deal source?

Through pipeline automation, admin/agents can now send emails to the users or deal source.

For example: Suppose an agent wants to send a thanking email to the users for showing interest, when the deal cards reach stage 1 , he can set the pipeline automation for the same.

To send an email via Pipeline Automation:

  • Choose the template
  • Choose the agency email from which the email is to be sent
  • Put the subject
  • Select whom to communicate: user or deal source
  • Choose when to send (immediately or after)
  • Write the mail body
  • Attach any files if required.
  • Click to Save.
  • Text

How to set automation to send text messages to users or deal source?

Through pipeline automation admin/agents can now send text messages to the users or deal source. 

For example: Suppose an agent wants to send an intimation text message to the user when a deal card has entered into final stage and the insurance policy is issued, he can do that from pipeline automation

To send a text message via Pipeline Automation:

  • Choose the template
  • Put the title
  • Select whom to communicate: user or deal source
  • Choose when to send (immediately or after)
  • Write the message and save.
  • Task

How to assign tasks via automation?

Admin/ Agent can assign tasks for their agents through pipeline automation.

  • Give the Task Name
  • Select Agent/ Assignee
  • Select the priority from the drop-down (↓) – High, Medium, Low, or Normal
  • Select the Task Type from the drop-down (↓)
  • Set the due date
  • Write your message in the mail body
  • Click on Save.

Multiple agents in Task in Pipeline Automation

You can assign multiple agents when creating task automation. If the deal card moves from one stage to another it will be linked to the assigned agent of the deal card in case if you select Assigned Agent in Automation or Selected Agents will be assigned to the task

Note:  You have to be logged in as an admin to add/edit a pipeline automation

Note:
Assigned agents – card agents will be Assigned to task
Selected agents – selected agents in automation will be Assigned to task, not card agents

To view the enhancement: 

  • Navigate to Pipelines
  • Click 3 dots icon (action) and select Automation
  • Click on Add Automation
  • Click on Task
  • Set the task template, task name, priority, time, description and assignee name.
  • Click to save.

Note: You can select multiple assignees or the assigned agent. 

In case if you move the deal card from one stage to another, it will be linked to the card assigned agent.

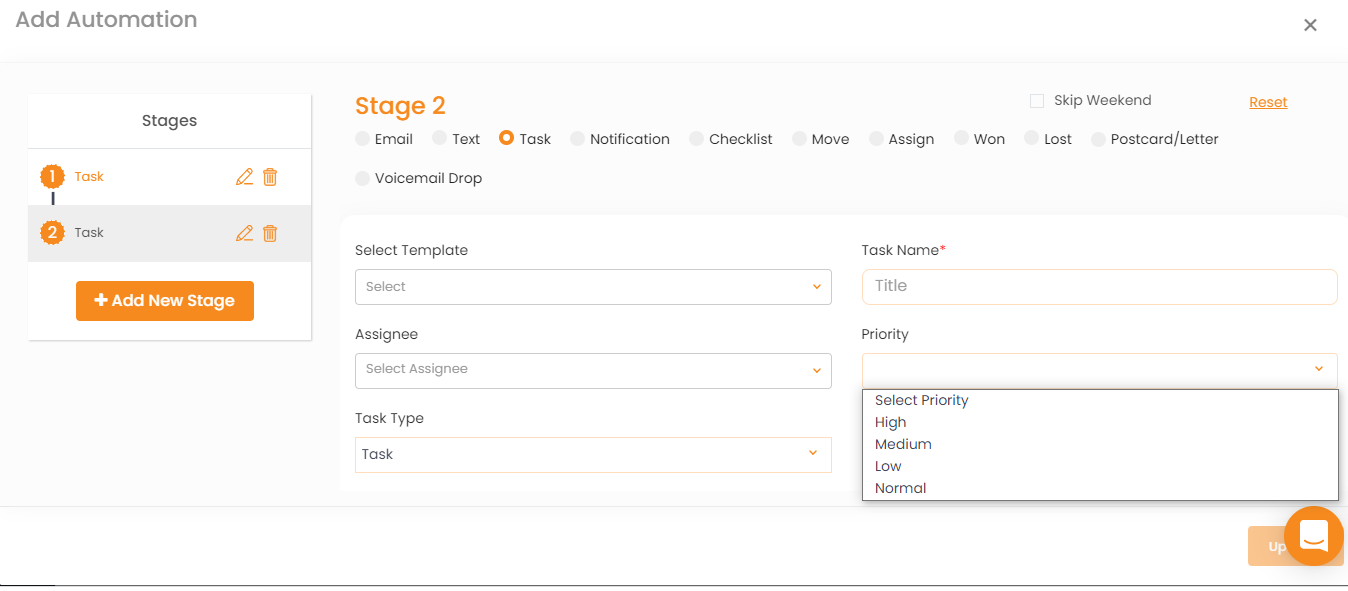
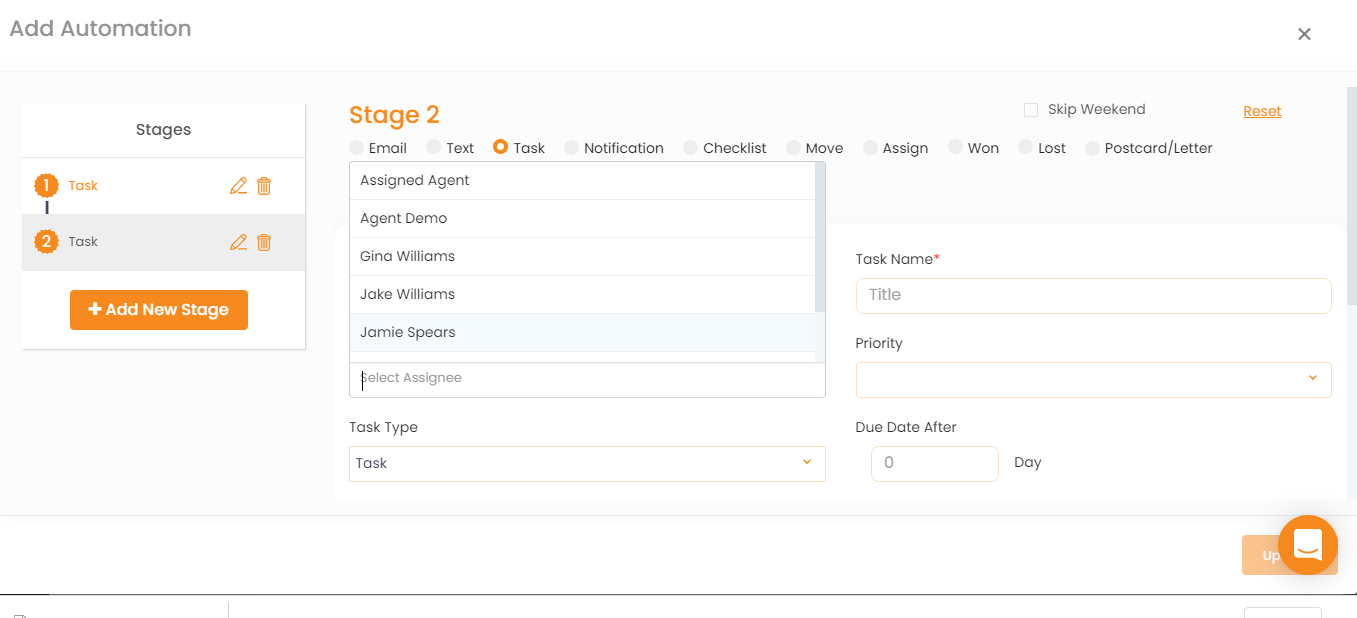
Use Case: A deal card has assigned agent Gina Williams (primary) and Jake Williams. This deal card has been moved from stage A to Stage B and the automation is set in Stage B, then task will be assigned to the assigned agent of that card, i.e. Gina Williams.
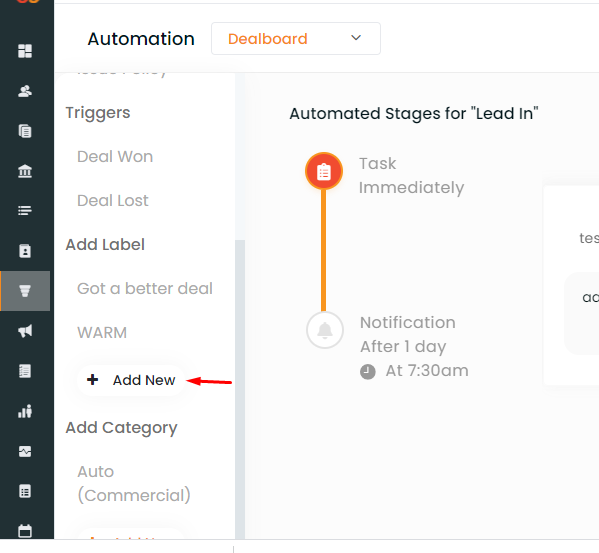
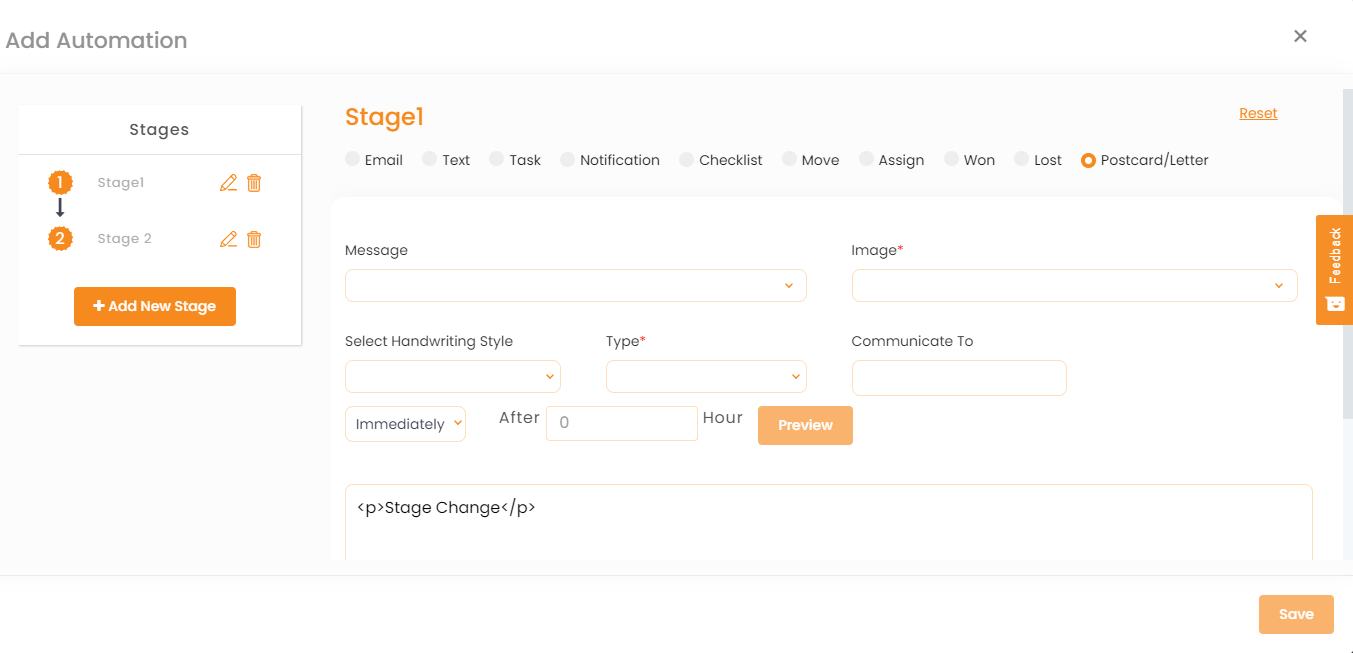
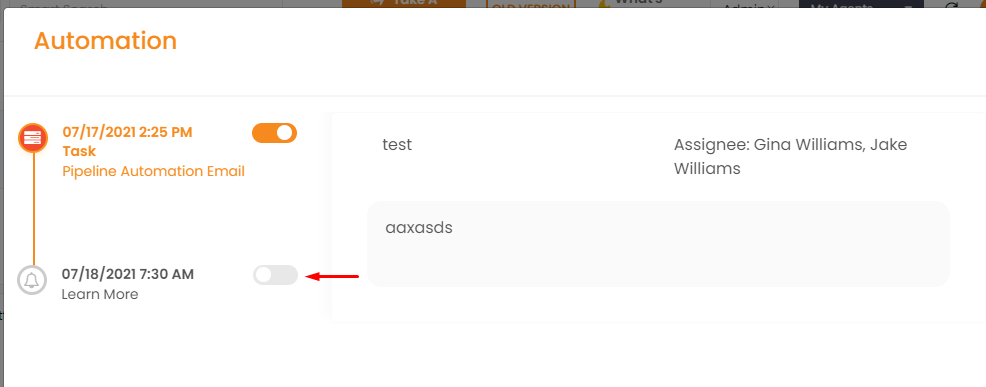
  • Notification

How to create notification through automation?

Admin/ Agents can create automation for sending notification to the agents at various stages as required. 

For example: If Admin wants to generate a notification for an agent when the deal card moves from one stage to another, with the help of automation, the notifications can easily generate.

To send notification:

  • Choose the Template
  • Select Assignee
  • Write a subject
  • Set the time trigger– Immediately or After
  • Write the mail
  • Attach any file if required.
  • Click on Save.
  • Checklist

How to create an automation for checklist?

Now you can create an automation for checklist whenever there will be a stage change or category change that you have set, the automation will trigger. 

How to add automation for checklist:

  • Select Trigger time.
  • Select the checklists for which you want to add automation.
  • Click on Save.
  • Move

How to create automation for moving a deal card from one stage to another?

Agents can now create automation for moving the deal card from one stage to another based on certain conditions.

For example, the Agent is setting a trigger for the issue policy pipeline and wants to set that when a deal card reaches stage four, it gets moved to follow up pipeline.

Once the automation content is set:

  • Click on move.
  • Set the time trigger– Immediately or After

In case of after: choose day/week/month, number of days/weeks/months, time, or after how many hours.

  • Select the pipeline stage where the deal card is to be moved
  • You can click on start stage automation to start or can click on stop running automation to stop.

Once the card will move from stage 4 the move action will get activated and as per the set time, the trigger will run.

  • Assign

How to create automation for assigning a deal card to an agent while the deal card moves from one stage to another?

If a deal card is moving to a different stage, where you want to assign it to a different agent, then you can select the trigger time and name of the agent from the drop-down. The deal card will be allotted to that particular agent from/after the given point of time.

  • Won

How to mark a deal card as won when it reaches a particular stage?

If a deal card moves to the particular stage which is denoted as the won stage and you want to set a trigger for the agent who has reached that stage, can do that by selecting the won section of pipeline automation.

  • Set the trigger time
  • Select the name of the agent who won from the drop-down
  • Give a won description
  • Select the start won drip to start the automation
  • Select stop running automation to stop it.
  • Lost

How to mark a deal card as lost when it reaches a particular stage?

  • Set the trigger time
  • Write subject line
  • Select lost reason
  • Set X date
  • Select the name of the agent who lost from the drop-down
  • Give a lost description
  • Check the box to open this card automatically on X date
  • Select the start lost drip to start the automation
  • Select stop running automation to stop it.
  • Mail

How to send a Postcard/ Letter to any user or deal source when the deal gets into a particular stage?

If Thanks.io is activated then you can send the postcard/ letter to the users or deal source on any deal closing/ event/ occasion.

  • Select the message
  • Select the image
  • Select Handwriting style and type
  • Select whom to communicate
  • Select the time
  • You can have the preview by clicking on the preview button
  • Write the message
  • Click on save.
  • Voicemail drop (Ringless voicemail)

How to send ringless voicemail when a deal gets into certain stage ?

If slybroadcast integration is already done, then this feature will be accessible to the agent.

  • Select the stage where you want to add voice drop automation.
  • Choose Voice Drop
  • Choose when you want to send- Immediately or After
  • In case of after select the hours after when you want to send
  • Select the audio file to upload
  • Check the caller id
  • Click on save

So, when the deal card of the selected pipeline will reach the stage that you have set to sent the voice drop, it will trigger automatically. 

Versatile feature of Pipeline Automation: Through pipeline automation, you can send communication to both users and deal source at one time from the same automation. You can set the trigger at the particular stage where he wants to send communication to both user and deal source.

For example: If an agent is creating automation in the first stage of the deal, and wants to send a thank you note to a user for showing interest and at the same time to the deal source for providing the lead.; he can do that from the same pipeline automation.

Enhancement! July 2021

Copy Card Action in the Pipeline Automation

One can easily copy a deal card to a different stage of a pipeline through automation. 

Note: The task will be performed once the copy card automation is triggered for the selected stage. The stage that will be selected for copying the cards, then the card will get copied in that stage.

Process to copy a card in the selected pipeline via automation:

  • Navigate to Pipelines and select the pipeline for which you want to set the automation

  • Click on the action button to select automation

  • Click to add new automation stage

  • Select copy and set the trigger time.

  • Select the pipeline and the stage.

  • Click to save or save as draft.

  • The automation details for copying the card will get updated
  • Once you go back to the pipeline and drag any card to the selected stage you will get the notification saying the selected deal card is copied to the respective pipeline and stage.

  • Click on apply


  • You will get the update.

Once you go to the expanded view of the deal card that has been moved to a different stage, in the timeline section you can find all the details of the card that has been moved from one stage to another.

Even if you navigate to the drip campaigns section of the deal card, you will find the automation that has been set for the particular stage. Click on the automation to view the drip analytics.

Enhancement! April 2021

Draft pipeline automation

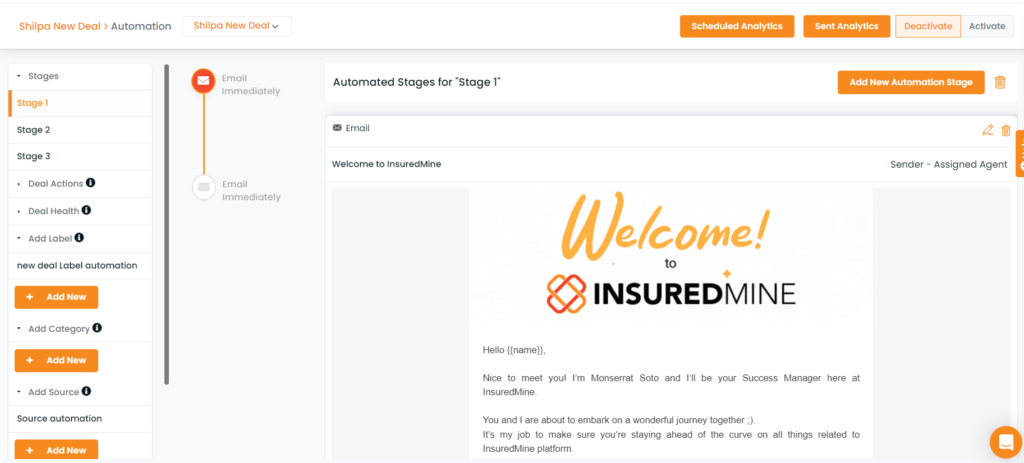
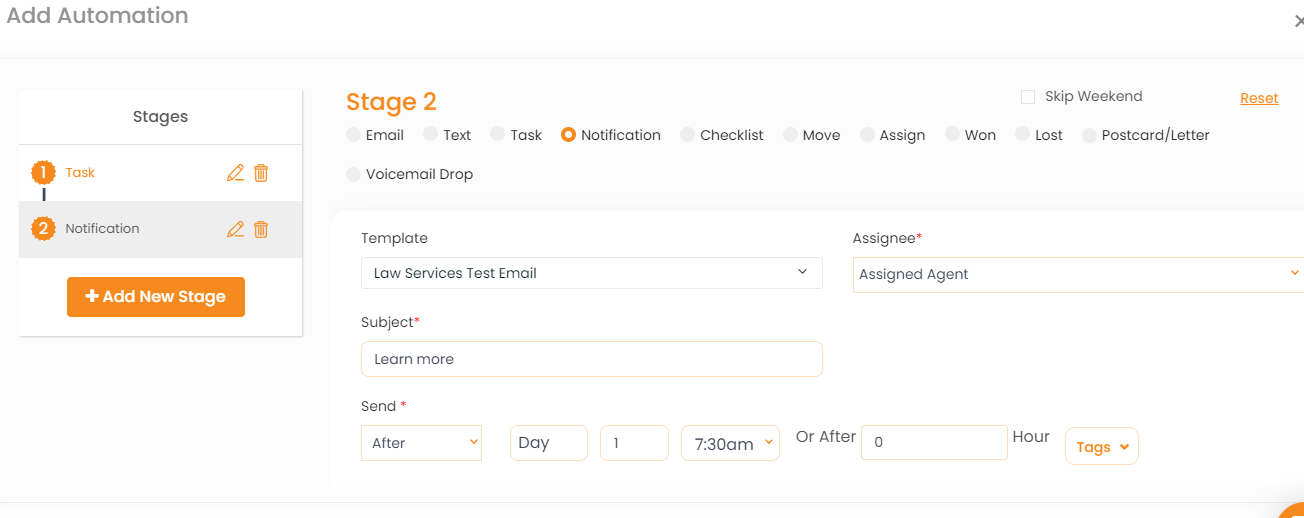
When creating an automation you can save it as a draft. You can do this when setting automation at any stage. This feature is available for all types of workflow in pipeline automation.

Note: This feature can only be accessed when logged in as an Admin

To view:

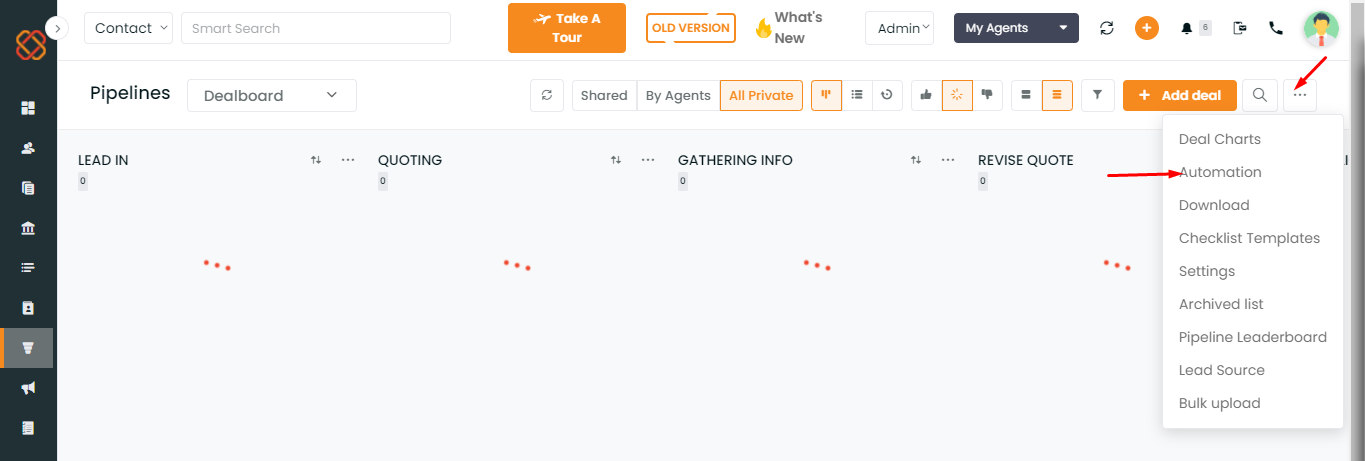
  • Navigate to Pipeline Manager
  • Click on the gear icon and select Automation
  • Click on add automation
  • Fill in the details and click on save as draft
  • The automation will be saved as a draft.

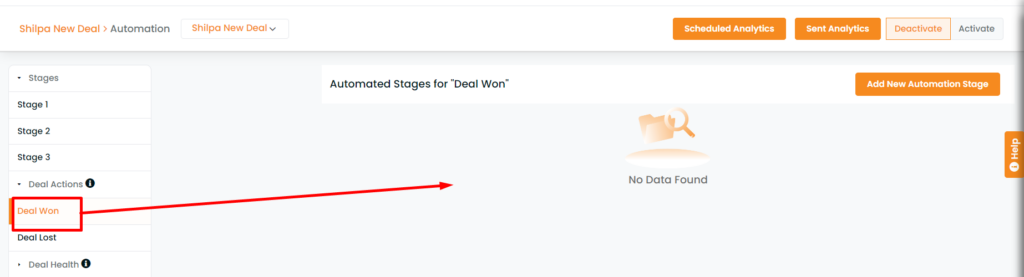
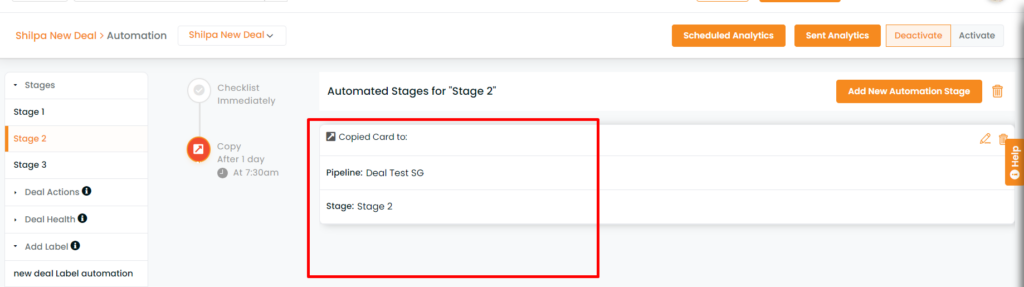
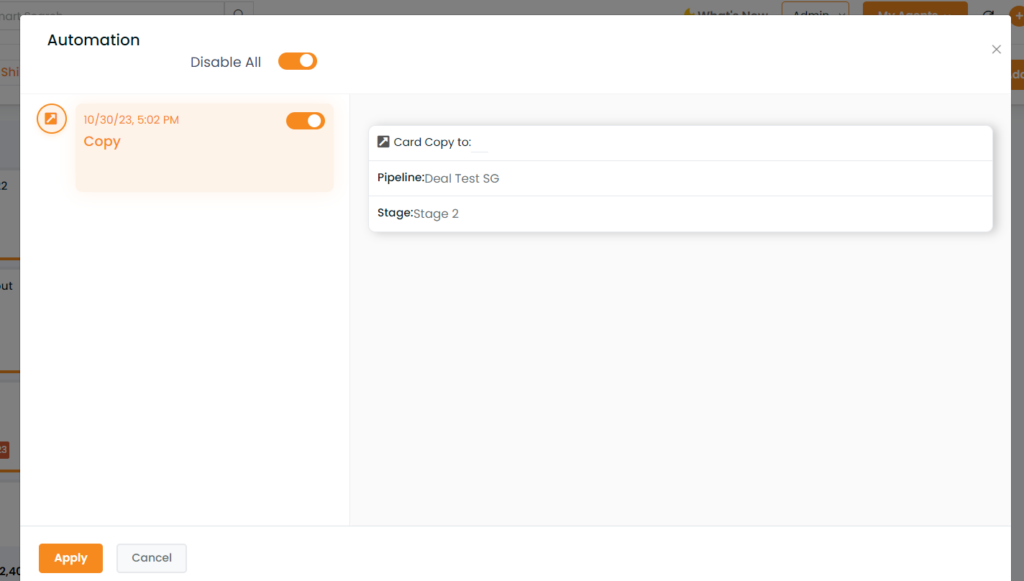
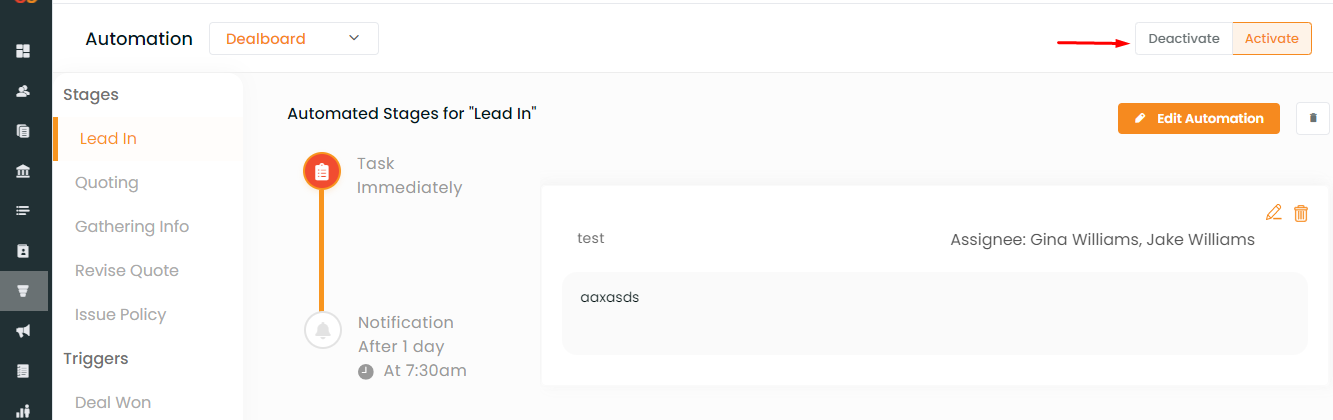
Note: Options have also been provided to activate or deactivate automation so that an admin can deactivate an automation and it will not assign in future deal cards.


How to activate and deactivate pipeline automation?

Whenever automation will be about to start as per the set time, there will be an option to activate or deactivate the automation.

There are two other options on the top right

  • Activate
  • Deactivate

You need to select any one option

To stop prior automation on that particular stage of the deal card click on deactivate, you can stop that automation and start the new one.

To continue prior automation means, if there is any prior automation running on that particular stage of the deal card click on activate, you can run the new automation along with the prior automation, so in that case, both the automation will run simultaneously.

Note: While continuing prior automation you can also deselect any recent automation that has been set and choose a combination of prior and recent automation to run simultaneously.

The same saved automation campaign will be visible in the analytics section too. And the campaign that has been stopped will be displayed as stopped by the agent.

  • Click on Apply

You can also slide the toggle bar to deactivate any one step in the prior set automation.

You can also stop the running automation by clicking on the deal card and scroll down to the drip campaign section and click on stop button.

Enhancement! January 2021

Shared/Private Pipeline selection based on your previous usage

Application will automatically identify your previous selection and next time when you login or navigate to Pipeline it will show you the previous selection i.e. Private or shared.

For example: If you want to have a view of shared cards/ private cards of a particular pipeline then you can click on the sliding bar and select the shared/ private tab. This selection will be auto-saved. You can navigate to any other page or can even log out, but once you are back on the pipeline you can find the saved selection- Private/ Shared that you had selected.

Enhancement! January 2021

Business name tag in email and texts

Now you can use the Business Name tag to display your commercial account as a Business Name while sending an automated email or text to prospects or clients.

If you are using the business name tag, and if you are accessing through a commercial account then this tag is useful for you. This feature has been implemented in several modules.

To check the enhancement:

  • Navigate to Pipelines
  • Click on the 3 dots icon (action)
  • Click on Automation
  • Click on Add Automation
  • Click on Tags

Enhancement! July 2021

Filters for lead source and automation for lead source

You can create automation based on lead sources. This you can do through two different ways:

1. While adding automation be it email or text, you can now select the source too. 

2. While creating automation, you will get a direction option to add source in the left panel.


To view the enhancement:

  • Navigate to Pipeline and select the pipeline for which you want to create an automation.

  • Navigate to actions (3 dots) and click to add new automation stage

  • Select email or text to create automation, there you will get the option to add source (lead source)

  • Once created the automation draft, click on save.

  • You will find the source details mentioned in the automation flow as filters.

  • We have added a new filter for Email and Text mode as Lead Source.

Note: You can select multiple lead sources.

How can you add automation for lead source?

  • Navigate to pipelines and select the pipeline for which you want to add automation.

  • Navigate to Add source from the left panel and click on Add New.


  • Create the automation and add the source and save it.

  • The selected sources will be displayed in the Add Source section.

Related Articles

Would you recommend this article?

Related Categories

Contact Us

Looking for more information or want to try one of our paid plans?

EMAIL

PHONE

OUR LOCATION

Search
Generic filters

Most Search: Ams360Release Notes